You can download this complete example, Basic_Struts2_Ant, from Google Code - http://code.google.com/p/struts2-examples/downloads/list. Click on the link for Basic_Struts2_Ant.zip and save the file to your computer. Unzip the file and you should have a folder named Basic_Struts2_Ant. In that folder is a README.txt file with instruction on how to build and run the application.
| This tutorial assumes you already know how to create a Java web application, use Ant to build the web application archive (war) file, and deploy the war file to a Servlet container such as Tomcat or Jetty. |
To create a Struts 2 web application with the Struts 2 artifacts added to the the application's class path manually you will need to download the Struts 2 distribution from the Apache Struts website.
On the Struts 2 download page, click on the link for the current General Availability release. In that release's section you'll find several links. To get started with a basic Struts 2 web application you need to only download the Essential Dependencies Only zip file, which is approximately 12mb.
After downloading this zip file, unzip it. You should have a folder named the same as the current general availability release and in that folder will be a lib folder. The lib folder contains the Struts 2 jar files (e.g. struts2-core-X.X.X.X.jar, where X.X.X.X is the version) and other jar files Struts 2 requires (e.g. xwork-core.X.X.X.jar).
As we create our basic Struts 2 web application we will copy from the Struts 2 distribution lib folder just the jar files our application requires. As we add features to our application in future tutorials we will copy other jar files.
Step 1 - Create A Basic Java Web Application
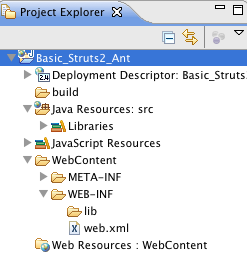
In your Java IDE create a web application project named Basic_Struts2_Ant. To follow along with this tutorial your web application should have the following folder structure:
Remember Struts 2 requires Servlet API 2.4 or higher, JSP 2.0 or higher, and Java 5 or higher. The example project, Basic_Struts2_Ant, which you can download from Google code http://code.google.com/p/struts2-examples/downloads/list was created using Eclipse 3.5 with Java 6.
Step 2 - Add index.jsp and Ant Build File
Our next step is to add a simple index.jsp to this web application. Create an index.jsp under WebContent with a title of "Basic Struts 2 Application - Welcome" and in the body add an h1 heading of "Welcome to Struts 2!"
Next create an Ant build.xml file that will compile any Java classes and create the war file. The code example download, Basic_Struts2_Ant, includes an Ant build.xml.
Run the Ant target that creates the war file (in the example downloaded that is the archive target, which places the war file in the dist folder). Copy the war file into your Servlet container so that it will deploy the war file.
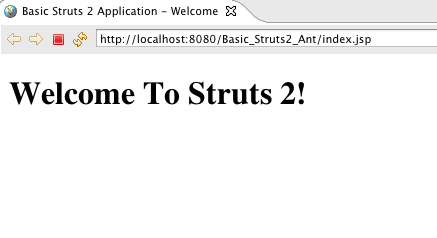
Start up your Servlet container and in a web browser go to http://localhost:8080/Basic_Struts2_Ant/index.jsp. You should see the following:
Step 3 - Add Struts 2 Jar Files To Class Path
Now that we know we have a working Java web application, lets add the minimal required Struts 2 framework Jar files to our web application's class path. We'll copy these Jar files from the lib folder of the Struts 2 download to the WEB-INF/lib folder in our web application.
Find and copy to WEB-INF\lib these files (note X.X.X.X.jar refers to the version number):
- asm-x.x.jar
- asm-commons-x.x.jar
- asm-tree-x.x.jar
- commons-io-X.X.X.jar
- commons-lang3-X.X.X.jar
- commons-fileupload-X.X.X.jar
- freemarker-X.X.X.jar
- javassist-X.X.X.jar
- ognl-X.X.X.jar
- struts2-core-X.X.X.X.jar
- xwork-core-X.X.X.jar
You can see from the above that the Struts 2 core jar depends on several other artifacts. As we add additional Struts 2 features in future tutorials, we'll need to add additional Struts 2 jar files and other transitive dependencies.
Step 4 - Add Logging
To see what's happening under the hood, the example application for this tutorial uses log4j. You'll need to download the log4j jar file and copy it to WEB-INF/lib. The example application uses log4j-1.2.14.jar http://archive.apache.org/dist/logging/log4j/1.2.14/.
Setup a log4j.xml configuration in the src folder. You can copy the one from the example application, which contains the following
<?xml version="1.0" encoding="UTF-8" ?>
<!DOCTYPE log4j:configuration PUBLIC "-//log4j/log4j Configuration//EN" "log4j.dtd">

<log4j:configuration xmlns:log4j="http://jakarta.apache.org/log4j/">

    <appender name="STDOUT" class="org.apache.log4j.ConsoleAppender">
       <layout class="org.apache.log4j.PatternLayout">
          <param name="ConversionPattern" value="%d %-5p %c.%M:%L - %m%n"/>
       </layout>
    </appender>

    <!-- specify the logging level for loggers from other libraries -->
    <logger name="com.opensymphony">
    	<level value="DEBUG" />
    </logger>

    <logger name="org.apache.struts2">
    	 <level value="DEBUG" />
    </logger>

   <!-- for all other loggers log only debug and above log messages -->
     <root>
        <priority value="INFO"/>
        <appender-ref ref="STDOUT" />
     </root>

</log4j:configuration>
Note the above log4j configuration specifies the console as the log target.
Step 5 - Add Struts 2 Servlet Filter
To enable the Struts 2 framework to work with your web application you need to add a Servlet filter class and filter mapping to web.xml. Below is the filter and filter-mapping nodes you should add to web.xml.
<filter>
  <filter-name>struts2</filter-name>
  <filter-class>org.apache.struts2.dispatcher.ng.filter.StrutsPrepareAndExecuteFilter</filter-class>
</filter>

<filter-mapping>
  <filter-name>struts2</filter-name>
   <url-pattern>/*</url-pattern>
</filter-mapping>
For more information about configuring the deployment descriptor for Struts 2 see web.xml. Note the url-pattern node value is /* meaning the Struts 2 filter will be applied to all URLs for this web application.
Step 6 - Create struts.xml
Struts 2 can use either an XML configuration file or annotations (or both) to specify the relationship between a URL, a Java class, and a view page (such as index.jsp). For our basic Struts 2 application, we'll use a minimal xml configuration. Note the file name is struts.xml and it should be in the src folder (struts.xml must be on the web application's root class path).
<?xml version="1.0" encoding="UTF-8"?>
<!DOCTYPE struts PUBLIC
    "-//Apache Software Foundation//DTD Struts Configuration 2.0//EN"
    "http://struts.apache.org/dtds/struts-2.0.dtd">

<struts>

	<constant name="struts.devMode" value="true" />

	<package name="basicstruts2" extends="struts-default">

		<action name="index">
			<result>/index.jsp</result>
		</action>

	</package>

</struts>
This minimal Struts 2 configuration file tells the framework that if the URL ends in index.action to redirect the browser to index.jsp.
For more information about the struts.xml configuration file see XML.
Step 7 - Build and Run the Application
With all of the above in place run the Ant target that creates the war file (in the example download that target is archive). Remove the previously created war file and exploded web application folder from your Servlet container's webapps folder. Copy to your Servlet container's webapps folder the new war you just created.
Start up the Servlet container. View the console where you should see numerous debug messages that tell you the Struts 2 framework is being included in the Basic_Struts2_Ant web application.
Open a web browser and go to http://localhost:8080/Basic_Struts2_Ant/index.action (note that's index.action not index.jsp at the end of the URL). You should see the same web page as when going to http://localhost:8080/Basic_Struts2_Ant/index.jsp. View the log messages written to the console and you should find several that discuss index.action and index.jsp:
com.opensymphony.xwork2.DefaultActionProxy.debug:57 - Creating an DefaultActionProxy for namespace / and action name index
...
org.apache.struts2.dispatcher.ServletDispatcherResult.debug:57 - Forwarding to location /index.jsp
Note that the xwork2 artifact is one of the Jar files we copied over to WEB-INF lib and is used heavily by the Struts 2 framework.
Getting Help
The Struts 2 user mailing list is an excellent place to get help. If you are having a problem getting this Basic Struts 2 application to work search the Struts 2 mailing list. If you don't find an answer to your problem, post a question on the mailing list.
| Next | Onward to Hello World Using Struts 2 |
|---|---|
| Prev | Return to Tutorials |